Kitchen Renovation Planning – Moodboard, Layout & IKEA Kitchen Design
Moving into our new apartment mid-February, I already knew at the first viewing in December that the kitchen had to go.
Not in a dramatic way — more in a "this is genuinely not functional and also a little sad" way. The countertops were at two different heights, there was a tiny built-in fridge we had absolutely no use for (we already had a full fridge-freezer combo), the upper cabinets were so small that half the wall above them was just... empty. And then there was the general state of things — cabinets falling apart, countertops that had seen better decades.
So we talked it over with our house owner and did what any reasonable person would do: ripped the entire thing out and started from scratch.
I had never planned or installed a kitchen before, but I was so excited about the possibilities — making the best out of the small space we had, on a rental budget, and actually making it beautiful. Today I'm taking you back to where it all began: the planning stage. Moodboards, measurements, color palettes, cabinet choices — this is how I turned a vision into a plan.
The Vision: Modern Farmhouse (But Make It Dark)
Once we got the go-ahead, my head was spinning full of ideas. I kept dreaming of open wooden shelves, a big farmhouse table, herbs on the windowsill, direct view onto a terrace...
And then I remembered I am designing a 7m² city kitchen on the third floor.
So I had to find a more realistic vision. The starting point was actually a cabinet we already owned — an IKEA BODBYN upper cabinet, white with glass inserts and that classic farmhouse-style front. I loved it. So all upper cabinets would get BODBYN doors.
But I didn't want an all-white kitchen. I wanted something moodier, warmer — cozy but with a modern edge. Less "bright airy farmhouse", more "lived-in, slightly dramatic, definitely has good coffee." So I toned down the farmhouse and leaned into the fact that our small east-facing room already felt a little darker anyway. I guess you could call it Modern Farmhouse (But Make It Dark).

Layout & Requirements: Starting with the Restrictions
Before moodboards and color palettes, I started with the hard constraints — because there were quite a few.
We needed to fit: a fridge-freezer combo, oven and stove (new purchase), washing machine, dishwasher, and a sink. The water supply, drain, and oven power connection were all on one wall and we didn't want to move any of it. We also had a small built-in pantry in the corner, an old chimney shaft that ate into the space, and a strangely low window that we eventually gave up on trying to make fully functional.
Storage was a priority too. In our last kitchen we had exactly one drawer. One. I still don't fully understand how we survived that.
With all the measurements taken and the restrictions mapped out, I opened the IKEA METOD kitchen planner.
walk through of the old kitchen
 starting off with (making) the floorplan
The IKEA Planner: More Fun Than Expected
The METOD system was actually recommended by a friend who had already installed a couple of IKEA kitchens — satisfied with the quality, customizability and price. After living with ours for a while, I have to say I agree.
The digital planner itself is actually pretty intuitive. Some elements don't want to go where you put them, and a few settings are hidden in weird places, but overall I genuinely enjoyed playing around with it. It felt a bit like designing a room in The Sims when I was 12, except this time it was actually for me - eek!
I tried an L-shaped layout first (top image), but the awkward corner gave me a hard time — the sink placement never worked, and everything felt cramped. It was our friend again who gave the best advice: forget the corner, go with two units facing each other (bottom image), and keep it simple.
That freed up the opposite corner for something I'd always wanted but never thought possible in a small apartment: a breakfast nook. We love eating in the kitchen, and leaving that corner empty to build a little seating area felt immediately right.
Once the layout was set, I started playing with door fronts, handles, countertops (all possible in the online planner might I add!) — and that's when the moodboard started to take shape.
 L-shaped layout — bad space usage
 final layout with space for breakfast nook
Kitchen Moodboard & Color Palette
Upper cabinets: BODBYN in white — already decided. Lower cabinets: I first wanted HAVSTORP in a darker color, but our IKEA was out of stock, so I pivoted to HAVSTORP in beige. Genuinely one of the best forced decisions of this whole project — it warmed everything up beautifully.
One tip if you're planning a kitchen: go to IKEA in person and actually hold the door fronts next to each other. Combine them with countertop samples and metal hardware, view them under different lighting if you can. The HAVSTORP beige looks completely different in our east-facing kitchen compared to the bright digital planner preview — much less boring-beige, much more warm and moody.
For the countertops I had envisioned hardwood, but the maintenance and price said otherwise. We went with a dark brown laminated MDF board instead — and it pushed the whole design further in the moody, modern direction. No regrets.
The accent color was actually a bit of a happy accident — I fed my cabinet and countertop colors into an online color matching tool just to see what it would suggest, and honestly, some results were a bit wild. But that deep wine berry kept coming up and I just loved it. IKEA happened to have a cutting board in almost exactly that shade, so that was an easy decision. I'll pull that color through in the textiles and decor once we get to the styling phase.

What Actually Happened
We had about a week between getting the keys and our moving date to: remove the old kitchen, clean and paint the room, buy all the cabinets and appliances, and install everything.
We did not make it. Not even close.
We didn't have a working stove for the first 8 days. The cabinets were assembled but not yet mounted on moving day. We bought countertops, did all the cutouts, and then discovered we'd bought the wrong size — not deep enough. The hardware store didn't have our first choice in the right size, so we had to choose a completely new design on the spot. The sink I'd envisioned either didn't exist or cost twice what we'd budgeted, so I ordered two and kept the prettier one. I bought the wrong faucet first. I think I visited the hardware store daily, sometimes twice. I got blisters from painting and cuts from pulling out the old kitchen. At least three people said they wanted parts of the old kitchen and then ghosted us.
I was completely exhausted by the end. But also genuinely proud.
We also painted the rest of the apartment that week, which in hindsight was perhaps ambitious. But the kitchen — unfinished, imperfect, half-assembled — already felt like ours. And I had learned a lot. Mostly everything that can go wrong. But also: trust your gut. And your moodboard.


Look at this gorgeous kitchen


What's Coming Next
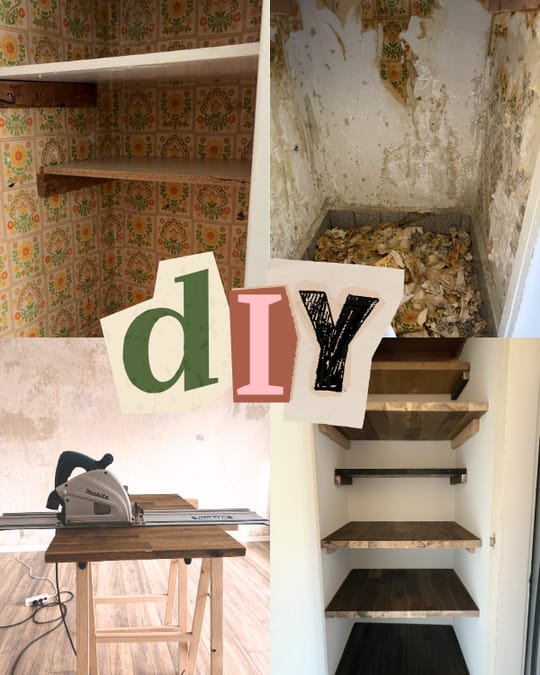
The built-in pantry had a 70s wallpaper situation — and a smell to match. That makeover is already done. Check out that wallpaper here.
The breakfast nook still needs to be designed and built — and I have plans that involve IKEA cabinets, a custom cushion, and a lot of measuring tape.
There are some fun DIYs in the works involving wood, stained glass painting, and a (thrifted) cabinet that's about to get a glow-up.
And eventually — the styling. Textiles, thrift finds, the finishing touches that will hopefully make this kitchen feel like home.